Use Custom Liquid Tags and Highlight Code Blocks in Your Blog
I know that there are plenty of automated options for websites and blogs out there, templates, plugins and the lot but I guess that part of being a developer is taking over challenges and overcoming them, in the process learning plenty of new stuff, understanding where your weaknesses lie so that you can focus on that and advance incrementally.
An Update To My Personal Blog
Personally, I've always wanted to build my portfolio/personal website from the ground up, every aspect of it, from the design to everything that goes on in the back-end.
So, this week besides other things I decided to ramp up the looks of my website's blog, part of a bigger overhaul of the design that has been in plan for some time.
After completing this task, more than just wanting to get a bit of feedback from those who may care to give that, I also wanted to share what this update was from a developer's scope for any other person who'd be interested to do this on their own.
I think this is a sound implementation for whoever cross-posts their articles with dev.to and would like to do that without the need to modify their article's content.
The Challenges
I can treat the challenges as either issues that needed fixing or features that needed implementing, depending on how you look at them. Here on-wards I'll be primarily calling them features, thus there were 3 main features that needed implementing.
Before going into each individual feature I would like to point out the major change that happened. Since I work with a markdown editor that I talked about in a previous post I used to store my article body in markdown format inside the database and when viewing the article I would then convert the markdown to html before displaying it to the page, this was bad implementation since that meant I used up more resources than I needed to on every page view.
So to fix that, in the current implementation while storing the article data in the database I process the markup first and create the necessary rich content embeds from the liquid tags then store the resulting html as one of the properties of the blog post alongside the raw markdown that I later use when updating my article.
Let's proceed with the features.
1. Code Highlighting
Initially the post details page as illustrated below contained code blocks that I styled manually to reflect the site's colors, but there is so much you can do with CSS and styling html code blocks, so I wasn't satisfied with that look and was looking forward to make some changes.

The Solution
I decided to use marked to parse the markdown code and highlightJs to highlight code blocks, both their documentations come quite handy when trying to accomplish this task.
Here are the instructions.
On your project start by installing highlightjs and marked
$ npm i highlightjs marked
Then initialize them utilizing highlightjs' core library:
const hljs = require('highlight.js/lib/core')
const marked = require('marked')
Since you would want to work with a small footprint as possible I'd advise that you use higlightjs by loading just the libraries you need, for example when trying to highlight a Javascript code block just load the library responsible for highlighting Javascript - hljs.registerLanguage('javascript', require('highlight.js/lib/languages/javascript')).
Given that you might write a blog post having a number of code blocks not necessarily of the same language the following custom marked renderer can help you cover that while still keeping a small footprint:
// code higlighter
const renderer = {
  code( code, infostring, escaped){
    let lang = hljs.highlightAuto(code); // get language
    hljs.registerLanguage(lang.language, require('highlight.js/lib/languages/'+ lang.language));
    let compiled = hljs.highlight(code, {language: lang.language}).value;
    return `<pre class="hljs"><code class="language-${lang}">${compiled}</code></pre>`
  }
}
Finalize by using the renderer on the initiated marked instance:
marked.use({ renderer });
Afterwards you can proceed to parsing your markdown resulting to html containing code blocks ready to be highlighted by highlightjs' stylesheets. Use one of the CSS flavours provided by highlightjs to highlight your code blocks as per your setup.
Then to get the final rendered HTML with the highlightjs CSS classes parse your markdown with markup:
const finalHtml = markup(articleMarkdown);
And Voilà! 
2. Liquid Tags
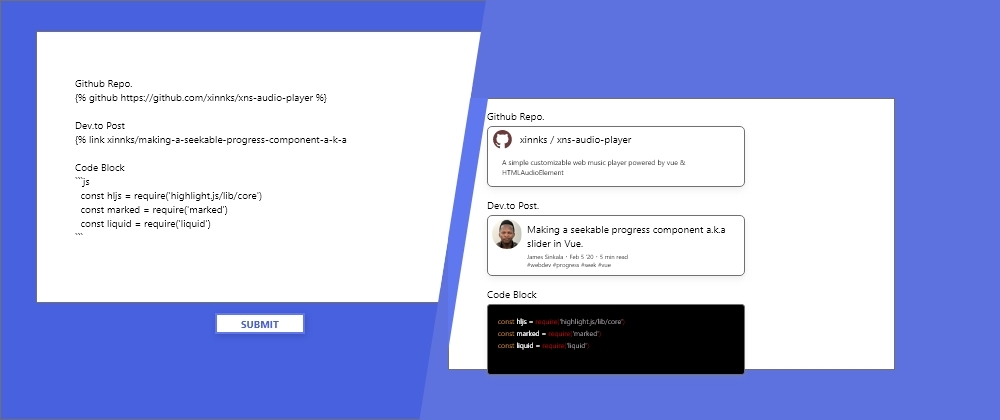
Before implementing this feature the following is what my article page would display:  Naked liquid template code.
And its shameful that I took this long to work on this, leaving my blog articles this way.
Let's get beyond my shame.
I wanted to display rich content just as you have on dev.to article pages from their custom liquid tags, the dev.to rich content embeds design was my inspiration for the final design I created.
The Solution
I used liquidjs - a Node.js port of the Liquid template engine to help me accomplish this. All you need to do is create custom tag classes that extend Liquid.Tag from the liquidjs library. Let me show you an example custom tag that gives us a dev.to post embed.
The Dev.to Article Embed
Here, you'll be using the dev.to Community API to get the data needed to enrich the embeded content, you'll need to create a DEV Community API key.
Head over to the dev.to settings and navigate to accounts: 
Then proceed to generating an API key: 
Next, you'll need to install the liquid package, and axios package which will help us perform HTTP requests to the API.
$ npm i liquid axios
Then, initialize liquid and it's engine:
const axios = require('axios')
const Liquid = require('liquid')
const engine = new Liquid.Engine()
If you are going to have a liquid link of the dev.to article just as it is in the dev.to markdown editor:
link author/post-title-slug
Start with creating the custom Liquid class that processes your custom tag as follows:
class devToLink extends Liquid.Tag {
  constructor (template, tagName, markup) {
    super(template, tagName, markup);
    this.variable = markup.trim();
  }

  async render(context) {
    const base = context.environments[0];
    if (!base[this.variable]){
      base[this.variable] = ''
    }
    let devTo = new Embeds(this.variable);
    let value = await devTo.getDevToEmbed();
    context.environments[0][this.variable] = value;
    return value.toString();
  }
}
Then register the custom tag class in the Liquid engine
engine.registerTag('link', devToLink);
Embeds() above is the class that fetches content from the dev.to API and constructs the markup for the embeded content. You can create your own custom design. A brief example of the class is as follows::
class Embeds {
  constructor(link){
    this.link = link;
  }

  async getDevToEmbed(){
    // fetch post's content
    const post = await axios.get(`articles/${this.link}`).then(result => result.data).catch(e => { /* handle errors here */});
    return this.devToPostMarkup({ /* utilize the content from api that you need in your embed */ })
  };

  devToPostMarkup = (contents) => {
    return `
      <style> /* custom embed styles here */ </style>
      <div> <!-- custom embed layout here containing including contents --> </div>
    `;
  }
}
Then process your article body to render the custom liquid tags into embeds containing the designs you made:
const finalHtmlWithEmbeds = engine
  .parse(articleWithLiquidTags)
  .then(template => template.render())
  .then(result => result);
After completing this feature I had to update my existing posts passing their markdown through the update above and now the article content looks like this: 
3. Article Page Layout
This feature was the easiest of the bunch as it only involved the changing of the layout of the article page from the last one that had only the article content laid out on the full width of the page: 
To a page layout that has a section on the right side for larger viewports that houses social buttons, links to other articles and probably more additions in the future. 
So these were the updates that went into the blog part of my website this week, more changes are going to come to the other parts of it in the coming weeks when time allows.
Hopefully in the future I'll be able to trace all the changes that went into this site and from that I will be able to see my growth as a web developer.
Lastly, I welcome all feedback regarding my website and what I could do to make it better.