Nuxt 3 authentication with Supabase
Supabase is the open-source Firebase alternative that presents us with back-end features such as a Postgres database, authentication, Edge functions, Storage, and Real-time subscriptions that we can use to build applications.
The interest of this tutorial is the authentication part, and, we are going to learn how to authenticate Nuxt 3 applications using Supabase.
To accomplish the task in this tutorial you need the latest LTS version of Node.js installed. And, the source code to the project being created in this tutorial is available in this - GitHub repository.
Setting up the Nuxt project
If you are new to Nuxt 3 the getting started with Nuxt 3 tutorial will be a good place to start. Otherwise, run the following script on your terminal to scaffold a new Nuxt project.
npx nuxi init nuxt3-supabase-auth
The above script will scaffold a new Nuxt 3 app. Get into the project directory - cd nuxt-supabase-auth and create the following pages and components.
The login and index pages
Delete the default App.vue component scaffolded with the install script since it's of no use in this app's setup.
Create a /pages directory and in it add 3 page components - index.vue, register.vue, and login.vue. Add the following code to each respective page component.
Starting with the login.vue component, add the following code.
<script setup>
  const credentials = reactive({
    email: '',
    password: '',
  });
</script>

<template>
  <h1>Log in to your account!</h1>
  <form>
    <div>
      <label for="email">Email</label>
      <input type="email" id="email" v-model="credentials.email" />
    </div>
    <div>
      <label for="password">Password</label>
      <input type="password" id="password" v-model="credentials.password" />
    </div>
    <div>
      <button type="submit">Submit</button>
    </div>
  </form>
</template>
As for the register.vue component, add the following code.
<script setup>
  const credentials = reactive({
    firstName: '',
    surname: '',
    email: '',
    password: '',
    passwordRepeat: '',
  });
</script>

<template>
  <h1>Create an account!</h1>
  <form>
    <div>
      <label for="first-name">First Name</label>
      <input type="text" id="first-name" v-model="credentials.firstName" />
    </div>
    <div>
      <label for="surname">Surname</label>
      <input type="text" id="surname" v-model="credentials.surname" />
    </div>
    <div>
      <label for="email">Email</label>
      <input type="email" id="email" v-model="credentials.email" />
    </div>
    <div>
      <label for="password">Password</label>
      <input type="password" id="password" v-model="credentials.password" />
    </div>
    <div>
      <label for="password">Repeat Password</label>
      <input
        type="password"
        id="repeat-password"
        v-model="credentials.passwordRepeat"
      />
    </div>
    <div>
      <button type="submit">Submit</button>
    </div>
  </form>
</template>
And lastly, for the index.vue component that replaces the App.vue as the home page add the following code.
<template>
  <h1>Welcome to the dashboard!</h1>
</template>
Ideally, the home page of the app is supposed to be guarded against unauthenticated access, meaning, all unauthenticated users ought to be redirected to the login page. To ensure this behavior, we will later create a guard that will take care of this.
Setting up the Supabase Nuxt 3 module
Next, integrate Supabase within the Nuxt 3 project.
Start by running the following script to install the Supabase module.
npm install -D @nuxtjs/supabase
Add the Supabase module to the Nuxt project's configuration - nuxt.config.js.
export default defineNuxtConfig({
  modules: ['@nuxtjs/supabase'],
});
The Supabase Nuxt module gives us access to the useSupabaseAuthClient, useSupabaseClient, and useSupabaseUser client-side Vue composables which can be utilized to achieve the goal within this tutorial.
Signing into the Nuxt 3 app
Inside the login.vue page, add a login function which with the assistance of the useSupabaseAuthClient() composable will set up the user sign-in logic.
// pages/login.vue

const client = useSupabaseAuthClient();
const router = useRouter();
const user = useSupabaseUser();

async function login() {
  const { email, password } = credentials;
  const { error } = await client.auth.signInWithPassword({ email, password });
  if (!error) return router.push('/');
  console.log(error);
}

watchEffect(async () => {
  if (user.value) {
    await router.push('/');
  }
});
Whenever issues arise with requests involved with the useSupabaseAuthClient()'s functions an error Object is always returned, else it is set to null.
In the above function when users are successfully authenticated the router is used to redirect them to the home page.
watchEffect is used in the above code to check if the user object is supplied by the useSupabaseUser() composable. This composable helps auto-import the authenticated Supabase user everywhere inside the Nuxt app. If the user is available as a result of a successful sign-in the app will redirect to the home page - /.
Registering users into the Nuxt 3 app
Inside the register.vue page, add a register() function that submits a registering user's details as filled in the provided form. The registration function's code is as follows.
// pages/register.vue

const client = useSupabaseAuthClient();

async function register() {
  const { firstName, surname, email, password, passwordRepeat } = credentials;
  if (password !== passwordRepeat) return;
  const { error } = await client.auth.signUp({
    email,
    password,
    options: {
      data: {
        first_name: firstName,
        surname,
        email,
      },
      emailRedirectTo: 'http://localhost:3000/login',
    },
  });
  if (error) {
    alert('Something went wrong !');
    return;
  }
  alert('Open the email we sent you to verify your account!');
}
As demonstrated previously with the signInWithPassword() function, the useSupabaseAuthClient() composable also gives access to a signUp function that takes some arguments the most important being the registering user's email and password. In this example, an options object is also passed which enables the specification of the redirection URL - emailRedirectTo sent in the account verification email received by the registering user. The data option specifies the extra information about the registering user being submitted along with the authentication credentials, in this case, the firstName and surname.
Up to this point, the app is not functional since the Supabase project credentials needed by the Nuxt module have not yet been provided, this will be done after having created a Supabase project.
Keeping unauthenticated users out
Before creating a Supabase project, an important piece of this app that was discussed above was the guarding of the home page from unauthorized access. This can be fulfilled by using a route middleware. Set one up by creating a /middleware root folder and adding a auth.js file in it. Add the following code inside this file.
// middleware/auth.js
export default defineNuxtRouteMiddleware((to, _from) => {
  const user = userSupabaseUser();

  if (!user.value) {
    return navigateTo('/login');
  }
});
The above route middleware ensures that unauthorized sessions to pages it's applied to are redirected to the /login page.
To apply the middleware to a page, in this case, the home page the following code needs to be added.
// pages/index.vue

definePageMeta({
  middleware: 'auth',
});
Logging users out
To log users out of the Nuxt app the logOut() function of the useSupabaseAuthClient() composable needs to be called.
Create a /components root directory and in it add a Navbar.vue component with the following code.
// components/Navbar.vue

<script setup>
  const client = useSupabaseAuthClient();
  const user = useSupabaseUser();
  const router = useRouter();

  async function logOut() {
    const { error } = await client.auth.signOut();
    if (error) return;
    await router.push('/login');
  }
</script>

<template>
  <nav>
    <div>
      <button v-if="user" @click="logOut()">Log Out</button>
    </div>
    <div>
      <NuxtLink v-if="!user" to="/login">Login</NuxtLink>
    </div>
    <div>
      <NuxtLink v-if="!user" to="/register">Register</NuxtLink>
    </div>
  </nav>
</template>
In this component the /login and /register routes are exposed when a user is not authenticated, else the Log Out button is displayed.
The Log Out button calls the logOut() function that logs a user out and redirects the app to the /login page.
To bring all the parts of the UI together, create a default layout component by adding a /layouts root folder and adding a default.vue component adding the following code in it.
<template>
  <Navbar></Navbar>
  <slot></slot>
</template>
Now, the navigation bar together with its routes and buttons will be visible on every page depending on the authentication status of the app.
Setting up Supabase for a Nuxt 3 app
The second part of this tutorial involves creating a Supabase project. To accomplish this, first, create a Supabase account.
After creating an account and completing the authentication process you'll end up in the Supabase dashboard. Create a new organization, then a new project.

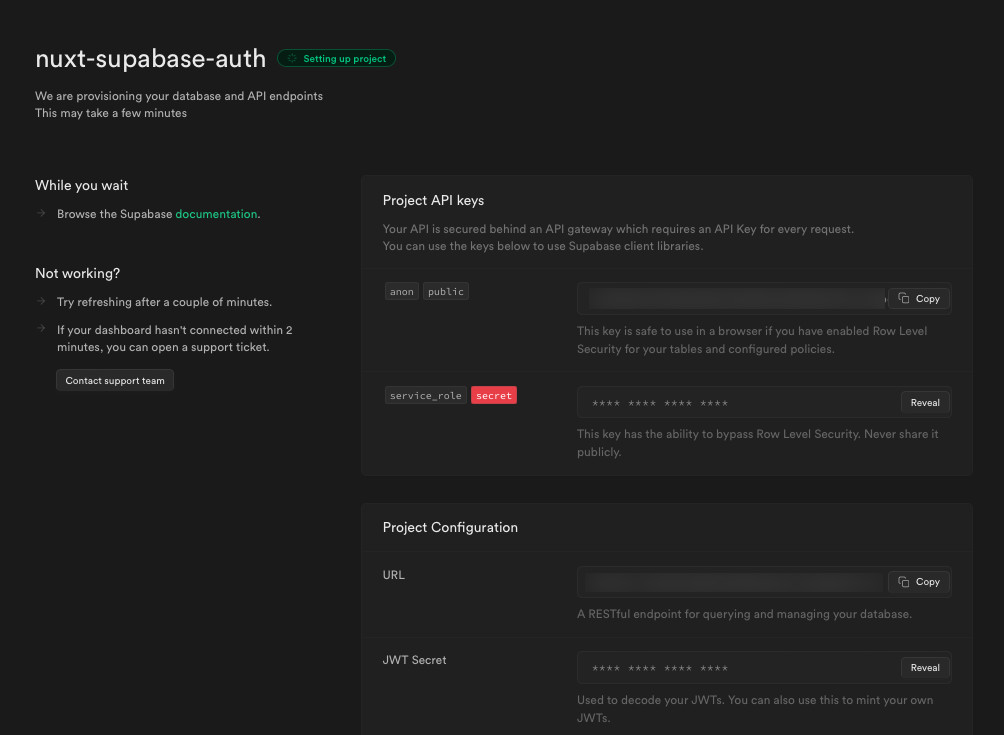
After the project has been created, the proceeding page presents its details, amongst them its URL and key: anon public.

Create a .env file at the root of the Nuxt app, declaring a SUPABASE_URL and SUPABASE_KEY environmental variables in it, then populate them with the values obtained after the creation of the new Supabase project.
Setting up authentication within Supabase
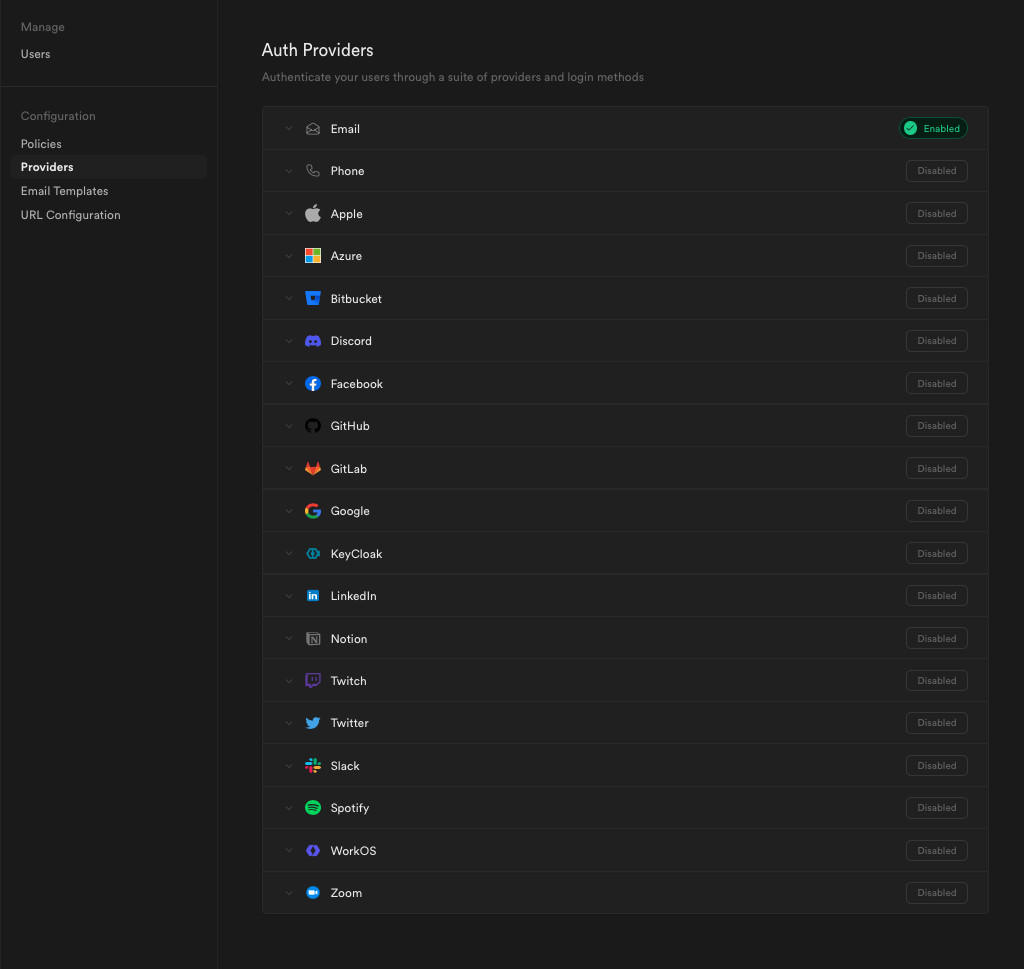
Supabase provides a plethora of options to choose from when it comes to setting up user authentication. Users can be authenticated into an application by using various providers supported by Supabase's authentication as displayed in the figure below.

The above choice of providers can be viewed by going to Authentication > Providers within the Supabase dashboard.
By default, the email provider is enabled just as displayed in the above figure. The focus of this tutorial is on authenticating users into the Nuxt app created using the email method, so no changes are to be made here.
Supabase authentication credentials table
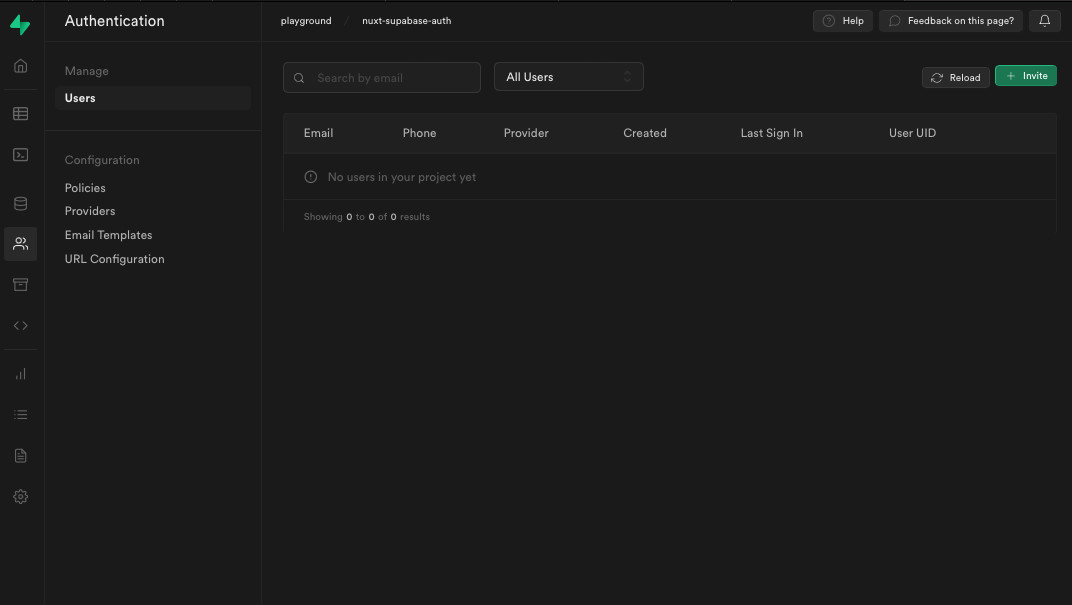
Supabase separates the authentication table from other data tables. On the event of registration of a user, the authentication credentials are placed inside the users table within the authentication section of the dashboard. Since no user has been registered, this table should be empty as demonstrated below.

Within the Supabase dashboard, tables and other elements can be created graphically or using SQL scripts inside the SQL editor.
Apart from the user authentication credentials that will be stored inside the users table in this demonstrational app, additional user data such as the first and surnames of registered users will need to be stored somewhere else. To do this, a table needs to be created that will hold this extra data.
Paste and run the following SQL script inside the SQL editor to create some tables, functions, and triggers.
create table profiles (
  id uuid references auth.users on delete cascade not null primary key,
  updated_at timestamp with time zone,
  email text,
  first_name text,
  surname text
);
create function public.handle_new_registration()
returns trigger as $$
begin
  insert into public.profiles (id, email, first_name, surname)
  values (new.id, new.raw_user_meta_data->>'email', new.raw_user_meta_data->>'first_name', new.raw_user_meta_data->>'surname');
  return new;
end;
$$ language plpgsql security definer;
create trigger on_new_user_created
  after insert on auth.users
  for each row execute procedure public.handle_new_registration();
A profiles table that will hold the user data discussed previously is created in the first part of the above SQL script. From the create function to $$ language plpgsql; part a Postgres function that creates a new record inside the profiles table whenever a new user is registered written in plpgsql is created. Lastly, a trigger associated with the authentication - users table that calls the function above whenever a new record is added is also created.
The data passed as raw_user_meta_data inside the database function is obtained from what was passed inside the data option in the registration function created in the registration page - pages/register.vue.
Now, when a new user is registered, a new profiles table record will be created containing the fist_name, surname, and the email of the user as provided inside the registration form.
Putting all this together, the app should work as follows.

Summary
To summarize this tutorial, we have learned the following:
- Using route middlewares to guard pages in Nuxt 3
- Adding modules to Nuxt 3 apps
- Setting up and using the Supabase Nuxt 3 module
- Using the composables provided by the Supabase module to authenticate users in and out of a Nuxt 3 app
- The creation of a Supabase project and integration into a Nuxt 3 app
To learn more about Nuxt 3 and Supabase, you can refer to their respective documentation:
